Secrets to Perfect Chocolate Marshmallow Linzer Cookies: Your Ultimate Guide
As the crisp air of autumn gives way to the cozy chill of winter, there's nothing quite as comforting as wrapping your hands around a warm mug of hot chocolate. But what if you could capture that feeling, that delightful combination of rich chocolate and ethereal marshmallow, in a single, irresistible bite? Enter the chocolate marshmallow linzer cookie – a confectionary marvel that transforms your favorite winter beverage into a melt-in-your-mouth experience. This guide will walk you through the secrets to crafting these heavenly sandwich cookies, ensuring every batch is perfectly tender, bursting with true chocolate flavor, and filled with a cloud of sweet marshmallow.
Crafting the Perfect Chocolate Linzer Dough: Beyond the Basics
The foundation of any exceptional linzer cookie is its dough. While the basic ingredients are simple, the nuances in technique and ingredient quality make all the difference between a dry, crumbly cookie and one that’s tender, rich, and truly irresistible. Many bakers, including Valerie in her initial attempt, have encountered challenges like dry texture or an overpowering cocoa taste. Let's tackle these common pitfalls head-on.
1. The Power of Butter: Temperature and Quantity
The reference recipe calls for ¾ cup of unsalted butter at room temperature, and this is crucial. Butter that's too cold won't cream properly, leading to a lumpy, uneven dough. Butter that's too soft can make your cookies spread. Aim for butter that gives slightly when pressed, but still holds its shape. If you've ever had a dry cookie, it could be due to slightly less butter than intended or an imbalance with the flour. Precise measurement is key here, and using a kitchen scale for flour can further enhance accuracy.
2. Unlocking True Chocolate Flavor: Cocoa and Beyond
Valerie noted her cookies had a "too prominent cocoa powder taste" and she desired a "more real chocolate taste." This is a common aspiration for chocolate cookie lovers. Here's how to achieve it:
- Dutch Process Cocoa: The recipe correctly specifies Dutch process cocoa. This type of cocoa has been treated with an alkali to reduce its acidity, resulting in a darker color and a mellower, less bitter chocolate flavor compared to natural cocoa. It's excellent for creating a deep, rich hue.
- Adding Melted Chocolate: For that "real" chocolate depth, consider incorporating a small amount of melted, good-quality dark chocolate (60-70% cacao) into your dough. This adds a complex, nuanced chocolate profile that cocoa powder alone sometimes can't deliver. A tablespoon or two, cooled slightly, can be added with the egg and vanilla for an extraordinary flavor boost without altering the texture significantly.
- Quality Matters: Invest in high-quality Dutch process cocoa. The difference in flavor is noticeable.
3. The Gentle Touch: Mixing and Chilling
Once you've creamed your butter and sugar, added the egg, vanilla, and cocoa, it's time for the dry ingredients. The recipe advises mixing just until the dough comes together, and this is vital. Overmixing flour develops gluten, which can lead to tough, chewy cookies – the opposite of the tender snap we want in a linzer. As soon as you see no more dry streaks, stop mixing.
Chilling the dough for at least an hour (or even overnight) is non-negotiable for perfect linzer cookies. This step allows the butter to firm up, making the dough much easier to roll without excessive flour, preventing stickiness, and helping the cookies maintain their shape during baking. It also gives the flavors time to meld, improving the overall taste and texture.
The Dreamy Marshmallow Filling: Homemade vs. Shortcut
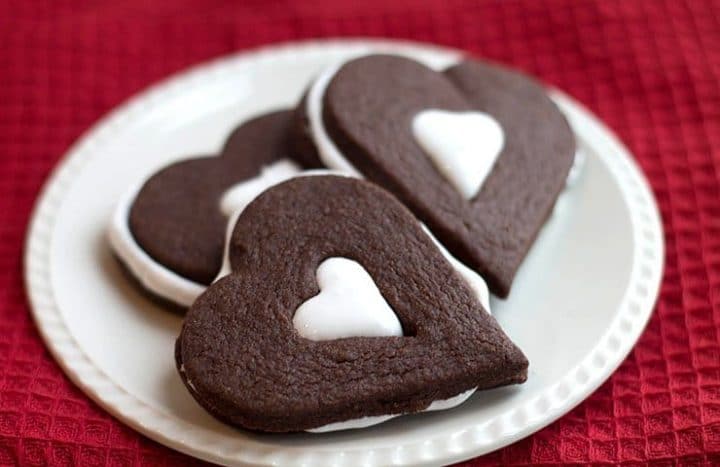
What sets these apart from other chocolate cookies is the pillowy, sweet marshmallow filling, reminiscent of a perfect cup of hot chocolate. The choice between homemade marshmallow creme and store-bought fluff offers both convenience and gourmet appeal.
Store-Bought Marshmallow Fluff: The Easy Route
For sheer convenience, store-bought marshmallow fluff is an excellent option, as noted in the reference. It's ready to use, consistently smooth, and saves a significant amount of time. It's perfect for when you're making these cookies with kids or need a quick dessert. A simple spooning and gentle pressing are all that's required. Just ensure the fluff is at room temperature for easy spreading.
Homemade Marshmallow Creme: A Touch of Elegance
As Valerie herself discovered, homemade marshmallow creme is "delicious" and "easy to make." While it adds an extra step, the reward is a lighter, airier, and often more flavorful filling. Made from sugar, water, corn syrup, egg whites, and vanilla, homemade marshmallow creme has a delicate texture that truly elevates these cookies. If you're looking to impress or simply enjoy the process of from-scratch baking, this is the way to go. You can find many recipes for this online if you want to dive into that delightful endeavor. For more on creating truly dreamy marshmallow experiences, explore recipes like our Hot Chocolate Linzer Cookies: A Marshmallow Dream Recipe.
Tips for Filling:
- Don't Overfill: A teaspoonful (or slightly more, depending on your cookie size) is usually enough. Overfilling can cause the marshmallow to squeeze out the sides when pressed or create a messy appearance.
- Spread Evenly: Use the back of the spoon or a small offset spatula to spread the fluff gently to the edges of the base cookie.
Assembling Your Masterpiece: Linzer Layering & Baking Wisdom
Once your dough is perfectly chilled and your marshmallow choice made, it's time for the magic of rolling, cutting, and baking.
Rolling and Cutting with Precision:
On a lightly floured surface, roll out one disk of dough to about 1/4 inch (6 mm) thickness. Rolling between two sheets of parchment paper can prevent sticking and ensure even thickness without adding too much extra flour. Use a 2.5-inch round cookie cutter for your base cookies. For the tops, use the same cutter, then a 1-inch round cutter to create the classic linzer "window." Remember to separate the whole cookies from those with holes on your baking trays.
Don't be afraid to re-roll dough scraps, but try not to do it more than once or twice, as it can make the dough tougher. Briefly re-chilling re-rolled dough can also help maintain its texture.
Baking to Perfection: Avoiding Dryness
Preheat your oven to 350°F (175°C). The recipe wisely notes that cookies with holes bake faster (8-10 minutes) than those without (10-12 minutes). This is because the hole reduces the overall mass and surface area. Keep a close eye on them, as overbaking is a prime culprit for dry, crumbly cookies. Cookies are done when the edges are just set, and the centers no longer look wet. They won't brown significantly due to the cocoa, so rely on texture and light firmness. Let them cool completely on the baking sheet before transferring.
The Final Assembly and Setting Time:
Once cooled, spoon your marshmallow fluff onto the base cookies, then gently top with a holed cookie, pressing lightly to adhere. The final, critical step the recipe mentions is letting the assembled cookies sit for 2 hours at room temperature to "dry." This isn't about drying the cookie itself, but allowing the marshmallow filling to set slightly, preventing it from being overly sticky or spreading too much, and marrying the flavors. This creates the optimal sandwich cookie experience. For more tips on making these and other delicious sandwich cookies, check out our guide on Chocolate Marshmallow Linzer: The Ultimate Sandwich Cookie.
Troubleshooting Common Linzer Woes for Flawless Results
Even with the best intentions, baking can sometimes present challenges. Here’s a quick guide to common issues and their solutions:
- Dry and Crumbly Cookies:
- Cause: Overbaking, too much flour, or insufficient butter.
- Solution: Measure flour precisely (preferably by weight), don't overbake – pull them out when just set, and ensure butter is accurate and at room temperature.
- Weak Chocolate Flavor:
- Cause: Low-quality cocoa, or just cocoa without a deeper chocolate complement.
- Solution: Use high-quality Dutch process cocoa. Consider adding a small amount of melted dark chocolate to the dough for a richer, more "real" chocolate taste.
- Dough Difficult to Roll:
- Cause: Insufficient chilling, dough too warm.
- Solution: Chill the dough for at least an hour, or longer if needed. Roll quickly and efficiently, perhaps between parchment paper, to prevent it from warming up too much.
- Marshmallow Spills or Makes Cookies Soggy:
- Cause: Overfilling, or not allowing the cookies to set.
- Solution: Use a moderate amount of marshmallow fluff. Always let the assembled cookies sit for the recommended 2 hours at room temperature for the filling to stabilize.
By understanding these common issues and implementing the expert tips provided, you're well on your way to mastering the art of the chocolate marshmallow linzer cookie.
These chocolate marshmallow linzer cookies are more than just a treat; they're an experience. They embody the warmth and comfort of a hot chocolate, elevated into an elegant, satisfying cookie. With careful attention to ingredient quality, precise technique, and a little troubleshooting wisdom, you can transform a simple recipe into a spectacular dessert that will impress and delight. So, next time the cold winds blow, gather your ingredients, fire up your oven (even a new one!), and bake a batch of these exquisite cookies. You'll find that the combination of rich chocolate and dreamy marshmallow is truly, as Valerie discovered, heavenly.
